 |
|
|
|
Tutorial
|
Bead Project#1: Fantasy Bracelet
|
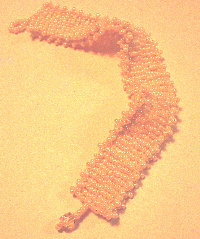
Fantasy Bracelet
INSTRUCTIONS
Materials needed: You will need a beading needle, size D beading thread, one tube of of size 11 beads in the color or colors of your choice and a larger bead, button or finding.
These are the instructions for the bracelets mentioned in the "dream" section. This technique was copied from a bracelet I purchased and studied to learn the technique. The bracelet In this project is 10 beads wide. ( I have made some up to 13 beads wide ).
1: Start off by stringing 10 beads. You might want to tie a knot around the first bead to secure it permanently or temporarily. We will think of the first bead as being on the left and the 10th as being on the right. Pick up five beads and go thru beads 5,4,3,2,1 of the first group of ten beads going right to left. You should now be coming out of the first bead (bead#1) on the left.
2: Now string 5 more beads. You should now be heading left to right go thru the first bead on the left ....of the first group of five beads continue thru beads 1-5 of that group ,this should bring you out of the right side of the bracelet. Now add five beads, you should be heading right to left, go thru beads 5,4,3,2,1 of the previous row, this should bring you out of bead one on the left side. Again add five beads go thru the group of five beads you added before the beads you are now adding. This should bring you out on the right side of the bracelet. You will continue adding rows of 10 beads in this manner(in 2 groups of 5 beads)until your bracelet is the desired length.
3: Notice the rough texture of the weave, not too impressive at this stage. We will need to add the side embellishments to really finish the bracelet. On the outer side of each row of the bracelet there is a thread. You will come out of one side of a row. Now add three seed beads and go down between the first bead on the left and the outer thread. Pull the thread to allow the three beads to form a picot shaped like the letter A. Add three beads and go up thru the area between the outermost bead and thread of the next row of beads. Continue in this manner until the end. This is how the original bracelet I bought was done.
4: However the groups of three beads tend to slide between the rows lateral to medially, to prevent this you could wrap your thread around the outer thread for each row of beads between your picots,to be more specific, when you add the picot group above the outer thread, wrap your thread around the outer thread and then add your next picot group, do this all the way down the side of the bracelet.
5: Another way to prevent your picots from sliding medially is when you are done adding the picot groups, you sew thread between the picot groups and the outermost bead for each row of beads.The thread would run in a straight line all the way up the sides of the bracelet. Experiment with both techniques and let me know which one you like.
|
|
 |